Automate Approvals with “Send Email with Options” in Power Automate
Approval workflows can sometimes feel like a bottleneck. Employees submit requests, managers dig through email threads, and decisions get delayed because nothing is centralized. Even when a manager is ready to approve, it might take several messages before the status is finally updated in the system.
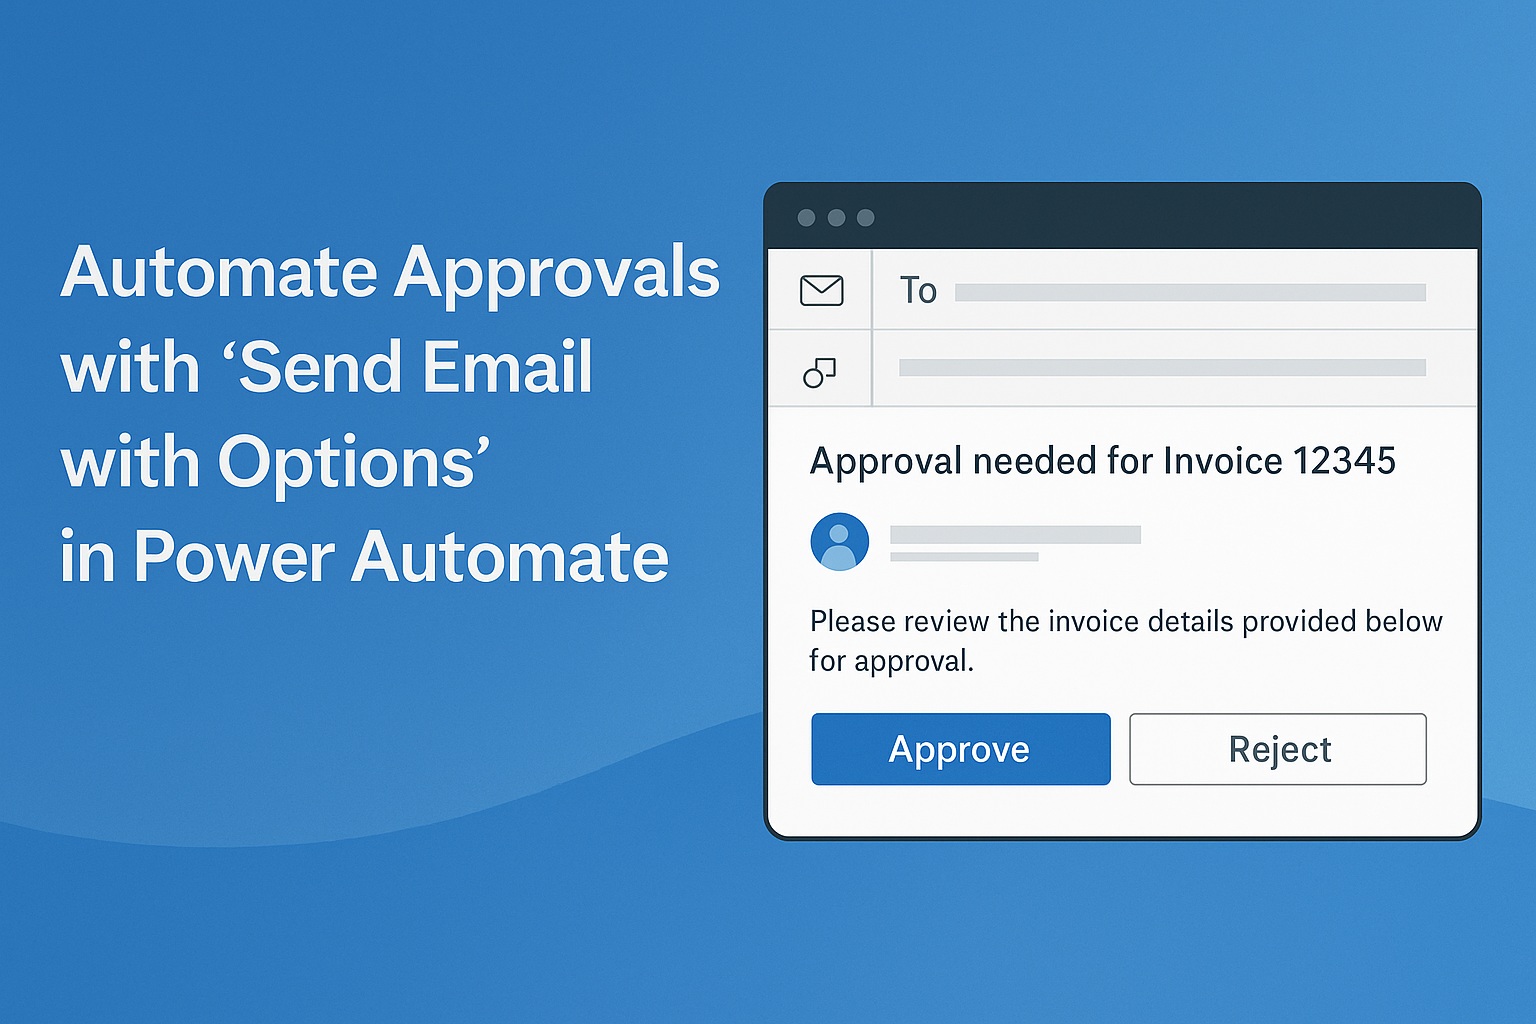
Now imagine if that whole process could be reduced to a single click inside an email. With Power Automate’s Send email with options action, approvers don’t need to log into another app or portal. Instead, they receive an email with built-in buttons—Approve, Reject, or any other options you define. Once clicked, the response is instantly sent back to the flow, which updates your data source automatically.
This feature is ideal for teams that want fast, lightweight approvals. Whether it’s approving a purchase invoice, updating an order status, or confirming a request, the workflow keeps both records and communication in sync without manual follow-ups.
What this tutorial covers
In this tutorial, you’ll learn how to:
- Trigger a flow when a new item or record is created (e.g., a purchase invoice).
- Send an actionable approval email with options like Approve/Reject.
- Capture the approver’s response.
- Update the original record’s field (such as Is Billed or Approved) to reflect the decision.
By the end, you’ll have a working flow that handles approvals right from the email inbox.
Why use “Send Email with Options”?
This feature works well when you need quick decisions and don’t want the overhead of a full approvals center. Here’s why it’s effective:
- Inbox-first: Approvers don’t leave Outlook—they respond from desktop, web, or mobile.
- Simple and fast: No separate portal, just a single click.
- Automatic updates: Decisions feed directly back into your data source.
- Customizable: You’re not limited to Approve/Reject—you can add more choices like Request Info or Escalate.
Prerequisites
Before starting, ensure you have:
- A Microsoft 365 subscription with access to Power Automate.
- Outlook is configured with the Office 365 Outlook connector.
- A data source such as SharePoint or Dataverse containing the records you want to update.
- A field in your data source (e.g., Is Billed or Approved) that will store the approver’s decision.
How the process works
Here’s the overall flow:
- A new record is created in your data source (for example, a purchase invoice).
- Power Automate sends the approver an email with Approve/Reject options.
- The approver clicks one of the buttons in their email.
- The response is captured by the flow.
- The record in your data source is updated automatically to reflect the decision.
Step-by-Step Guide with Screenshot Markers
Follow these steps to recreate the workflow. Insert your screenshots where indicated.
These instructions walk you through the full build, from trigger setup to testing. Read them in order, and you’ll see how each action connects seamlessly to the next.
Step 1: Create the flow and select a trigger
Begin by setting up the flow that will start whenever a new record is created.
- In Power Automate, go to Create → Automated cloud flow.
- Name your flow (e.g., Invoice Approval Flow).
- Choose a trigger based on your data source:
For SharePoint: When an item is created

For Dataverse/Dynamics 365: When a row is added.
Step 2: Add the “Send email with options” action
Next, set up the email that will be sent to the approver.
- Click + New step.
- Search for Send email with options (Office 365 Outlook).
- Configure the action:
- To: Enter the approver’s email address.
- Subject: Add a clear title (e.g., Approval needed for Invoice [ID]).
- User Options: Type Approve, Reject (or more if required).
- To: Enter the approver’s email address.

- Body: Provide context, like the requester’s name, invoice details, or a link to the item.

Step 3: Capture the approver’s response
The action generates an output containing the selected option. You’ll use it to update the record.
- Add a Condition step.
- In the left box, select the SelectedOption from Dynamic content.
- In the condition, choose equals → Approve.
- If the option is ‘Approve’, the ‘Yes’ branch will run.

- If not, the No branch runs automatically.
Step 4: Update the record based on the response
Now you’ll connect the approval decision to your data source.
- Inside the If Yes branch (Approved):
- Add an Update item/row step.
- Choose your data source (SharePoint or Dataverse).
- Map the record identifier (e.g., Invoice ID).
- Set the Is Billed/Approved field = Approve.
- Add an Update item/row step.
- Inside the If No branch (Reject):
- Add another Update item/row step.
- Map the same identifier.
- Set the Is Billed/Approved field = Reject.
- Add another Update item/row step.

Best practices
- Keep choices short: Use simple labels like Approve/Reject.
- Provide context in the email: Include enough details for the approver to make a decision without opening another system.
- Test in Outlook: The action works best in Outlook (desktop, web, and mobile). Other clients may not fully render the buttons.
- Plan for the future: You can extend the flow later by adding more options or extra steps, such as sending notifications.
FAQs
Q: Can I send more than two options?
Yes. You can provide multiple comma-separated values. Just handle them in your Condition or Switch step.
Q: What if my approver uses Gmail or another client?
The buttons may not display properly outside Outlook. In that case, include a fallback link in the email body.
Q: Is this the same as Power Automate Approvals?
Not exactly. The Approvals connector provides more history and features, while Send email with options is quicker and lighter.
![]()